Registration FAQ
Chosen names are specified on my.jh.edu. For more information, visit the chosen name page.
Newly Admitted Students: Please contact your respective admissions office to make any updates to your student information.
Alumni/Former Students: Please submit a request through SEAM’s online form and upload the required supporting document with your request. Acceptable supporting documents are:
- Any one of these: a court document, marriage certificate, or divorce decree; or
- All of these: a driver’s license, tax forms, and passport.
Current Students: To update your legal name, follow the instructions below.
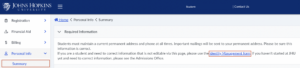
- Log in to SIS Self-Service.
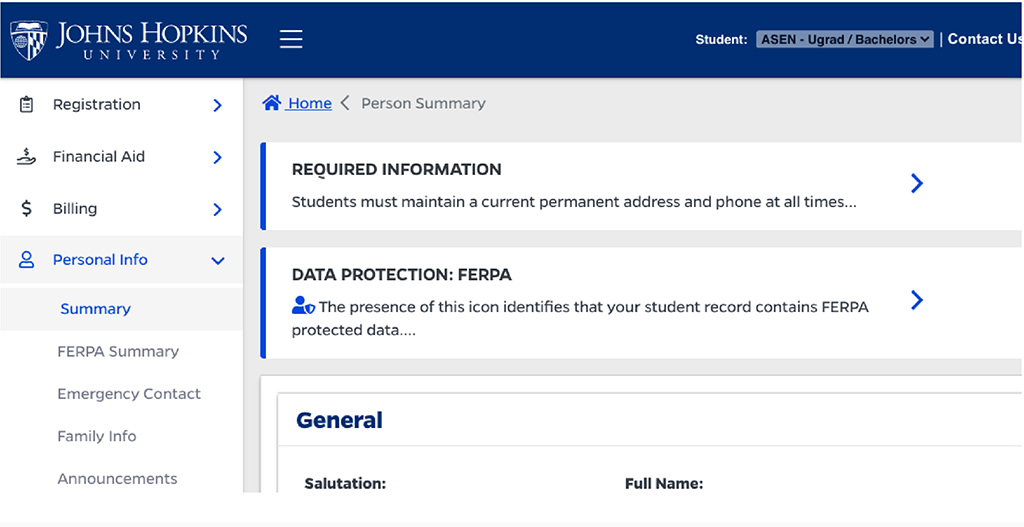
- On the left pane, click “Personal Info,” then “Summary.”
- Under the “Required Information” section, click “Identity Management form.”

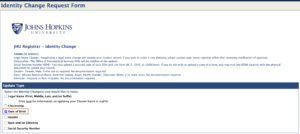
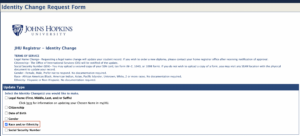
- On the Identity Management form, check the box next to Legal Name (First, Middle, Last, and/or Suffix).
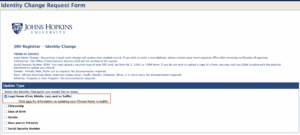

- Under the “Legal Name Change” section, use the New First Name, New Middle Name, New Last Name and New Suffix fields, to update your name, as necessary.


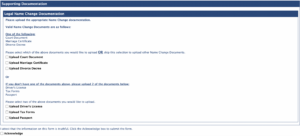
- Under the “Supporting Documentation” section, select the document you are uploading to support your request. If you are uploading a court document, marriage certificate, or divorce decree, select the corresponding box. Click the “Attach [document type]” button to browse for and upload the document. If you are not uploading one of the documents mentioned above, select the corresponding boxes for the two documents you are uploading from the second list (driver’s license, tax forms, passport, or credit card). Click the “Attach [document type]” button to browse for and upload each document.

- Check the “Acknowledge” box.
- Click “Submit.”
Newly Admitted Students: Please contact your respective admissions office to make any updates to your student information.
Alumni/Former Students: Please submit a request through SEAM’s online form, and upload the required supporting document with your request. A naturalization certificate or a passport are acceptable supporting documents.
Current Students: To update your citizenship information, follow the instructions below.
- Log in to SIS Self-Service.
- On the left pane, click “Personal Info,” then “Summary.”
- Under the “Required Information” section, click “Identity Management form.”
- On the Identity Management form, check the box next to Citizenship.
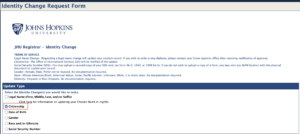

- Under the “New Citizenship Status” dropdown, select your updated status.


- Under the “Supporting Documentation” section, select the document you are uploading to support your request. A naturalization form or a passport are acceptable supporting documents. Click the “Attach [document type]” button to browse for and upload each document.
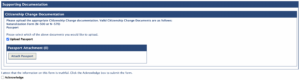

- Check the “Acknowledge” box.
- Click “Submit.”
Newly Admitted Students: Please contact your respective admissions office to make any updates to your student information.
Alumni/Former Students: Please submit a request through SEAM’s online form, and upload the required supporting document with your request. A current driver’s license, identification card, passport, or birth certificate are acceptable supporting documents.
Current Students: To update your date of birth, follow the instructions below.
- Log in to SIS Self-Service.
- On the left pane, click “Personal Info,” then “Summary.”
- Under the “Required Information” section, click “Identity Management form.”
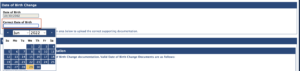
- On the Identity Management form, check the box next to Date of Birth.

- Under the “Date of Birth Change” section, use the Correct Date of Birth field to update your birthdate.

- Under the “Supporting Documentation” section, select the document you are uploading to support your request. A current driver’s license, identification card, passport, or birth certificate are acceptable supporting documents. Click the “Attach [document type]” button to browse for and upload each document.
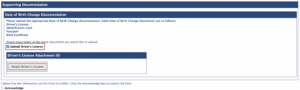

- Check the “Acknowledge” box.
- Click “Submit.”
Newly Admitted Students: Please contact your respective admissions office to make any updates to your student information.
Alumni/Former Students: Please submit a request through SEAM’s online form.
Current Students: Log into SIS Self-Service / Personal Info / Summary. You can update your information on this screen.
Newly Admitted Students: Please contact your respective admissions office to make any updates to your student information.
Alumni/Former Students: Please submit a request through SEAM’s online form.
Current Students: To update your race and/or ethnicity, follow the instructions below.
- Log in to SIS Self-Service.
- On the left pane, click “Personal Info,” then “Summary.”
- Under the “Required Information” section, click “Identity Management form.”
- On the Identity Management form, check the box next to Race and/or Ethnicity.

- Under the “Race/Ethnicity Change” section, use the New Race and/or New Ethnicity fields to update your information, as needed.


- Check the “Acknowledge” box.
- Click “Submit.”
Newly Admitted Students: Please contact your respective admissions office to make any updates to your student information.
Alumni/Former Students: Please submit a request through SEAM’s online form, and upload the required supporting document with your request. A social security card or tax form are acceptable supporting documents.
Current Students: To update your social security number, follow the instructions below.
- Log in to SIS Self-Service.
- On the left pane, click “Personal Info,” then “Summary.”
- Under the “Required Information” section, click “Identity Management form.”
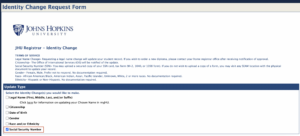
- On the Identity Management form, check the box next to Social Security Number.
- Under the “Social Security Number Change” section, use the New Social Security Number field to update your SSN.


- Under the “Supporting Documentation” section, select the document you are uploading to support your request. A social security card or tax form are acceptable supporting documents. Click the “Attach [document type]” button to browse for and upload each document.
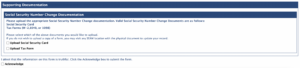

- Check the “Acknowledge” box.
- Click “Submit.”
To update or add your address, phone number or email, follow the instructions below:
- Log in to SIS Self-Service.
- Under the “Personal Info” tab, click “Summary.”

- Find the address, phone number, and email sections at the bottom.
- Click the “Edit” icon next to the selection that should be updated or added (certain items, such as Johns Hopkins email address cannot be updated since this is assigned by the university).
- On the edit screen, make all necessary updates. Lines that have an asterisk (*) are required.
- Once your edits/additions are complete, click “Save.”